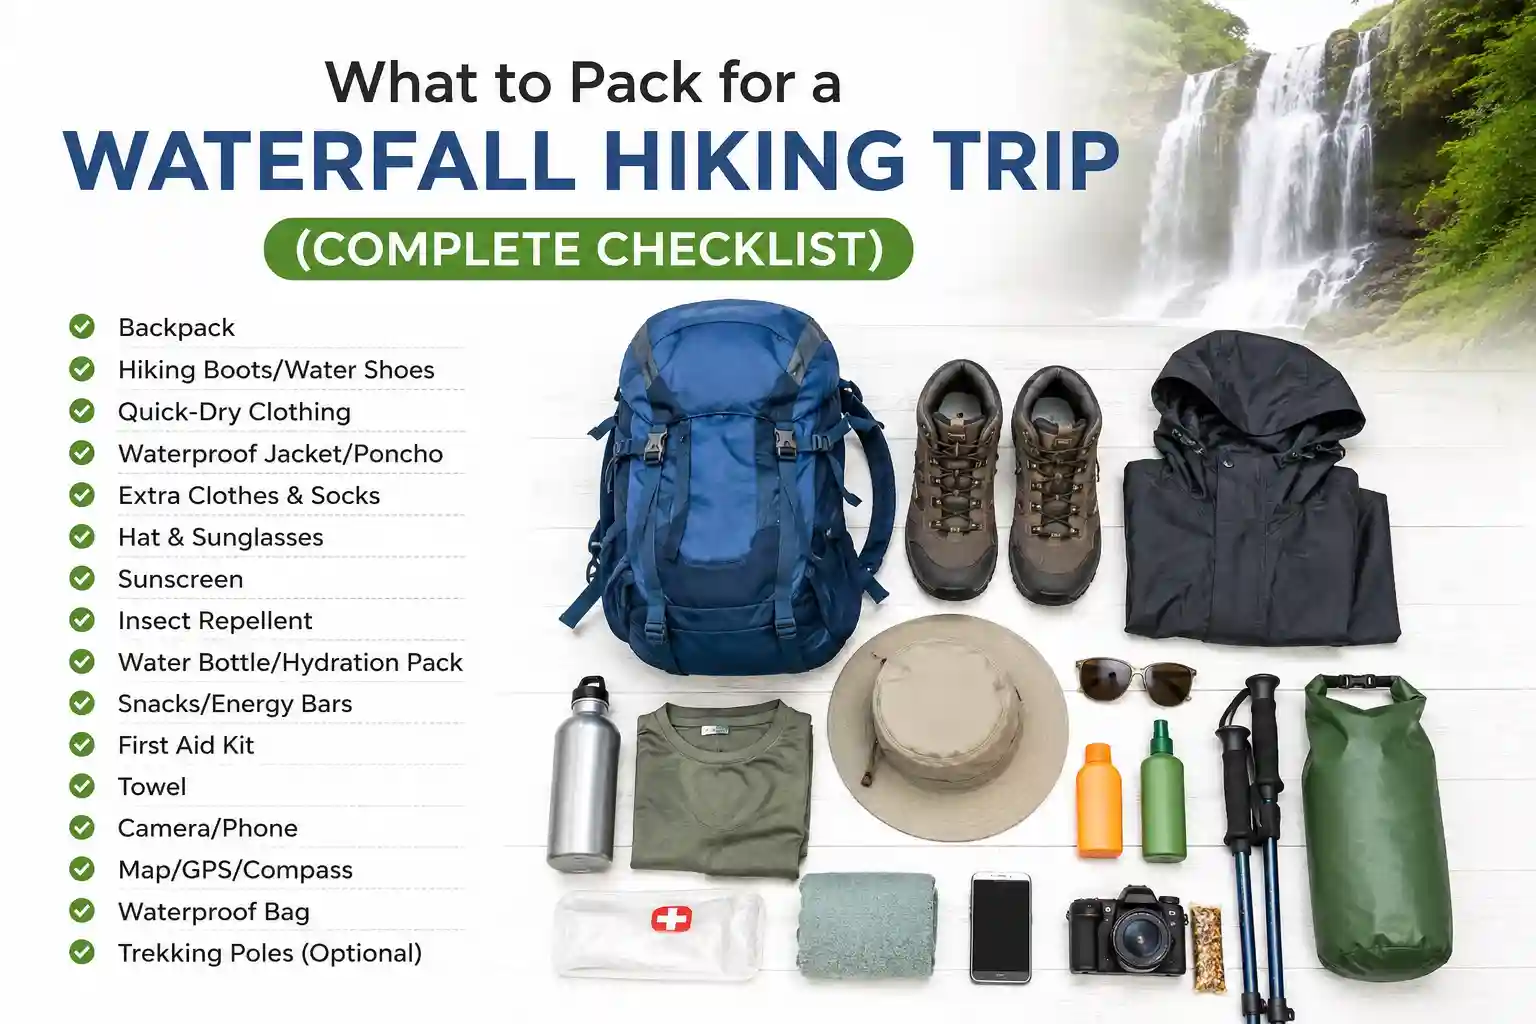
What to Pack for a Waterfall Hiking Trip (Complete Checklist) For Beginners
Waterfall hiking is a little different from regular trail hiking. The mist, the slippery surfaces, the sudden temperature drops near cascades—they all change what you actually need in your pack. This isn’t about having the fanciest gear. It’s about having the right gear for the specific challenges of chasing waterfalls.
Let’s walk through what matters, why it matters, and how to pack smart without turning your backpack into a moving van.
Let’s Talk About What Waterfall Hiking Actually Involves
Before we get to the checklist, a quick reality check. Waterfall trails in the US often share a few common traits, regardless of region:
- Mist and spray: Even if you don’t plan to get close, waterfall mist travels. Electronics, shoes, and clothing can get damp unexpectedly.
- Slick surfaces: Limestone, sandstone, and mossy rocks become slippery fast. Traction matters more than style.
- Microclimates: Temperatures near falling water can drop 10–15 degrees compared to the trailhead. That light jacket you left in the car? You’ll wish you had it.
- Variable trail conditions: A “short, easy” hike in dry weather can involve creek crossings, mud, or loose rock after rain.
Based on trail maintenance reports and visitor feedback from 2026, these factors don’t change based on how famous the waterfall is. They change based on geography, recent weather, and seasonal patterns. Packing with that in mind makes a noticeable difference.
The Core Packing List: Organized by Function, Not Just Category
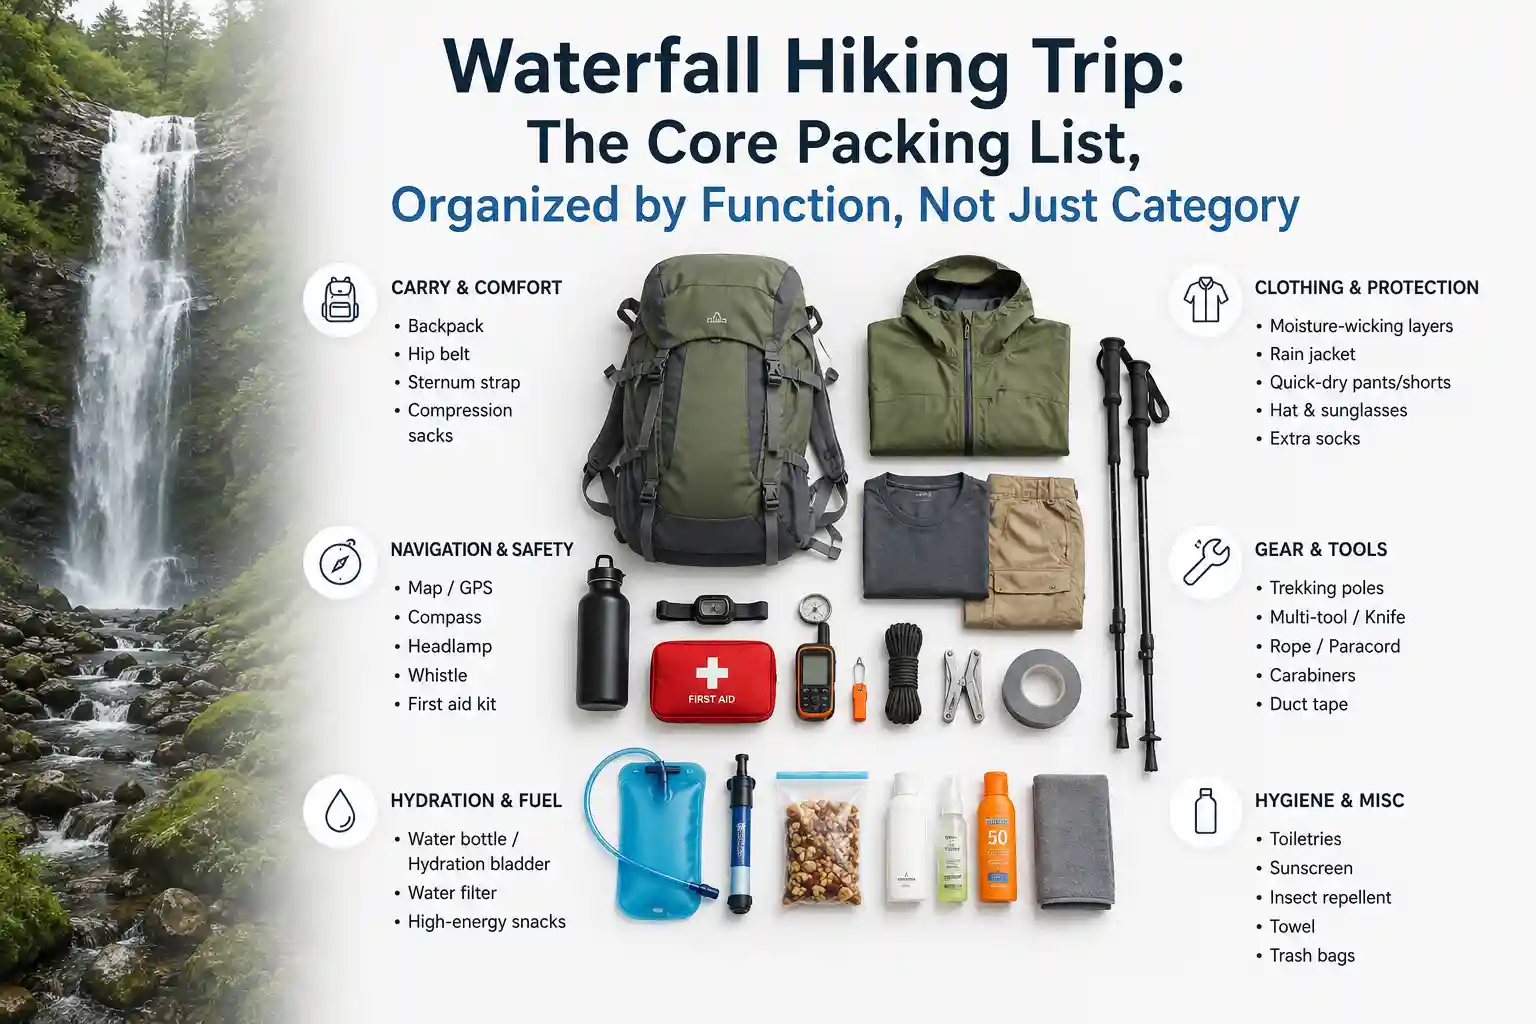
Instead of dumping everything into one big list, let’s group items by what they actually do for you on the trail. This helps you prioritize when space or weight is tight.
Footwear & Traction (Non-Negotiable)
This is where a lot of people underprepare. Flip-flops or smooth-soled sneakers might work for a paved overlook, but they become a liability the moment you step onto wet rock.
Trail runners or hiking shoes with aggressive tread: Look for rubber compounds designed for wet conditions. Brands matter less than actual grip.
Wool or synthetic socks (plus one extra pair): Cotton holds moisture and increases blister risk. If your feet get wet, a dry swap can save the rest of your hike.
Optional: Lightweight water shoes or sandals with straps: Useful if you plan to wade or cross creeks. Keep them clipped to your pack until needed.
A quick note: “waterproof” boots aren’t always the answer. If water gets in over the top, it stays in. Many experienced hikers prefer quick-drying, breathable footwear for waterfall trails.
Protection From the Elements (Beyond Just Rain)
Waterfall environments create their own weather. Packing for that means thinking beyond the forecast.
Lightweight, packable rain shell: Even if rain isn’t forecast, mist from falls can soak through regular jackets. A shell weighs little and packs small.
Insulating mid-layer (fleece or synthetic puffer): Temperature drops near water are real. This layer should compress small enough to stash when not needed.
Quick-dry pants or convertible hiking pants: Jeans are a bad idea. If they get wet, they stay wet and heavy. Technical fabrics dry faster and move better on uneven terrain.
Brims hat or cap: Helps keep mist and sun out of your eyes. Bonus: protects your face when you’re looking up at a cascade.
Tech & Navigation (Keep It Simple)
You don’t need a satellite messenger for a short waterfall hike. But you do need a plan for when cell service disappears.
Phone with offline maps downloaded: Apps like Google Maps or AllTrails let you save areas ahead of time. Do this at home, not at the trailhead.
Portable power bank (under 100Wh for air travel compliance): Cold, wet conditions drain batteries faster. A small backup prevents a dead phone when you need photos or directions.
Waterproof phone pouch or dry bag: Not for swimming—just for protection against mist and unexpected splashes. Test it at home first.
Small headlamp or flashlight: Even if you plan to finish before dark, delays happen. A lightweight headlamp takes up almost no space.
Hydration, Nutrition & Small Essentials
These items seem obvious, but waterfall hikes have a few specific considerations.
Water bottle or hydration bladder (plus purification tablets as backup): Some waterfall trails have natural water sources, but treating water is always safer than assuming.
Snacks that won’t melt or crumble: Protein bars, nuts, dried fruit. Avoid chocolate in warm weather—it turns into a mess in your pack.
Small first-aid kit: Focus on blister care (moleskin or tape), antiseptic wipes, and a few bandages. Waterfall trails often involve rocks and roots.
Insect repellent: Standing water attracts bugs. A travel-size spray or wipe takes seconds to apply and saves a lot of swatting.
Microfiber towel or bandana: Useful for drying hands, wiping mist off your lens, or managing sweat. Takes up almost no room.
Extras That Pay Off (If You Have Room)
These aren’t essential, but they solve common waterfall-hike frustrations.
Trekking poles: Helpful for stability on wet rocks or creek crossings. Collapsible versions pack small.
Zip-top bags or small dry sacks: For organizing wet items, protecting snacks, or separating trash. Cheap and versatile.
Compact camera or action cam (optional): If you want photos without risking your phone. A simple waterproof case can work too.
Lightweight sit pad: A small foam square lets you rest on wet rocks or damp ground without getting soaked.
How to Pack It All Without Overdoing It
Having the right items is half the battle. Packing them well is the other half.
Start with your backpack. For most waterfall day hikes, a 20–30 liter pack strikes a good balance: enough room for layers and essentials, but not so big that you’re tempted to overpack.
Organize by access frequency:
- Top pocket or outer compartment: Phone, snacks, rain shell, insect repellent—things you’ll grab quickly.
- Main compartment, middle: Water, insulating layer, first-aid kit—items you need but not constantly.
- Bottom or separate sleeve: Extra socks, dry bag with wet items, sit pad—things you’ll use later or hope not to need.
One practical move: do a trial pack at home. Load your bag, put it on, and walk around the block. If something feels awkward or heavy, adjust before you hit the trail. It’s easier to fix at home than halfway up a rocky path.
Scenarios: Adjusting Your Pack for Different Trips
Not every waterfall hike is the same. Here’s how to tweak your packing based on what you’re actually doing.
Short, paved overlook hike (under 1 mile):
You can scale back significantly. Focus on footwear with grip, a light layer for mist, a phone with offline maps, water, and sun protection. Skip the extra socks and heavy first-aid kit unless you have mobility concerns.
Moderate trail with creek crossings (1–3 miles):
Add trekking poles for stability, water shoes if you plan to wade, extra socks, and a more robust first-aid kit. A dry bag for your phone becomes more important here.
Longer hike with elevation change (3+ miles):
Prioritize weight distribution. Use a pack with a hip belt to shift the load off your shoulders. Add calorie-dense snacks, a slightly larger water capacity, and consider a lightweight emergency blanket. Cell service is less reliable on longer routes, so offline maps are essential.
Family hike with kids:
Pack one “shared” kit: extra snacks, a small first-aid supply, bug spray, and a lightweight emergency poncho. Let kids carry their own small water bottle and snack, but keep critical items in your pack. A change of clothes for each child in a dry bag can save a trip if someone gets soaked.
What Most Travel Blogs Get Wrong About Waterfall Hiking Packing Lists
You’ll see endless articles telling you to “pack waterproof everything” or “bring a change of clothes for every person.” That advice sounds thorough, but it often misses the reality of how people actually hike.
Here’s the gap: most lists focus on worst-case scenarios without helping you prioritize. If you pack for every possible problem, your bag becomes heavy and unwieldy—which creates its own set of issues on the trail.
A better approach: pack for the most likely challenges based on the specific trail and forecast. Check recent trail reports. Look at the photos from last week. Ask yourself: what’s the one thing that would ruin this hike if I forgot it? Start there, then add only what fits comfortably.
Another common oversimplification: assuming “waterproof” equals “better.” In warm weather, fully waterproof jackets can trap sweat and make you wetter from the inside. Breathable, water-resistant layers often work better for active hiking near waterfalls.
Video Credit: Carryology
Quick Answers to Questions People Actually Ask
Can I use regular sneakers for waterfall hikes?
For short, paved overlooks, yes. For any trail with wet rocks, mud, or creek crossings, footwear with aggressive tread and quick-drying materials is a safer choice. Slippery surfaces cause more trail incidents than people expect.
Do I need special camera gear for waterfall photos?
Not necessarily. A phone with a waterproof case works for most shots. If you want long-exposure effects (silky water), a small tripod and neutral density filter help—but they add weight. Decide if the photo style matters more than pack simplicity.
What about swimming at waterfalls?
If swimming is part of your plan, add water shoes, a quick-dry towel, and a dry bag for valuables. But always check local rules: some parks prohibit swimming due to safety concerns. Never dive into waterfall pools—submerged rocks are a serious hazard.
How do I keep my phone dry without a bulky case?
A simple zip-top bag (tested at home first) works for mist protection. For extra security, add a small silica gel packet to absorb moisture. Avoid using touchscreen-compatible cases in heavy mist—they often fail when wet.
Is a hydration bladder worth it for waterfall hikes?
If you drink frequently while moving, yes. Just remember to clean and dry it thoroughly after use, moist environments encourage mold. For shorter hikes, a standard water bottle is simpler and easier to refill.
Practical Recommendations
When putting together your waterfall hike pack, start with the terrain and weather forecast for your specific trail. A checklist is helpful, but context matters more. If recent rain is in the forecast, prioritize traction and moisture management. If it’s a hot, dry day, focus on sun protection and hydration capacity.
Another move that pays off: keep a dedicated “waterfall hike” pouch in your main pack. Stock it with the small essentials that are easy to forget—insect repellent wipes, a microfiber cloth, blister pads, and a zip-top bag. That way, you’re not rebuilding your kit from scratch every time.
Finally, remember that packing is iterative. After each hike, take two minutes to note what you used, what you didn’t, and what you wished you had. Over time, your personal checklist becomes more efficient than any generic list online.
About the Author
Eric Gamble is a travel researcher and editorial strategist focused on U.S. outdoor recreation logistics. His work centers on translating trail data, park policies, and accessibility considerations into practical guidance for travelers planning real-world trips. He does not chase viral destinations or fabricate personal adventure stories. His goal is simple: help readers make informed, confident decisions about where to go and how to prepare.
A Quick Failure Insight (Because Experience Isn’t Perfect)
Early on, I packed for a waterfall hike, assuming my “water-resistant” jacket would handle the mist. I didn’t test it beforehand. Halfway to the falls, my phone got damp from spray seeping through a zipper I’d assumed was sealed. The phone survived, but I spent the rest of the hike worrying about it instead of enjoying the view. That small oversight taught me: always test gear in low-stakes conditions first. A five-minute shower test at home beats a ruined device on the trail.
Leave a Reply